Last Updated 28 February 2023
Few things are as daunting as inspecting a hive for new beekeepers. Knowing what to look for, how to spot a queen, what to do to avoid irritating the hive, and how often to perform an inspection are all questions that new beekeepers may struggle to find solid answers to. Inspections also change depending on the time of year and individual colony purposes, so instructions for one beekeeper may be completely wrong for another.
To address this popular topic, we've divided this article into subsections addressing different types of inspections, along with how to perform them and when you should use them. After learning how to perform an inspection, the next best teacher is experience. So, get out there and take a look at your hives! If you still have questions during or after your inspection, you can visit our expert help center (coming soon).
Normal inspections should occur in periods of strong growth and colony strength, usually during the spring and summer months when the honey flow is strong and the bees are busy foraging. Beekeepers often disagree on how often inspections should occur, but the general consensus is that you should inspect a colony every 2-4 weeks in countries with varroa mites, and about every 1-2 months in countries without them (currently only specific areas of Australia). Some beekeepers inspect more or less often, and specific colony circumstances should inform your decision on when to inspect your hives.
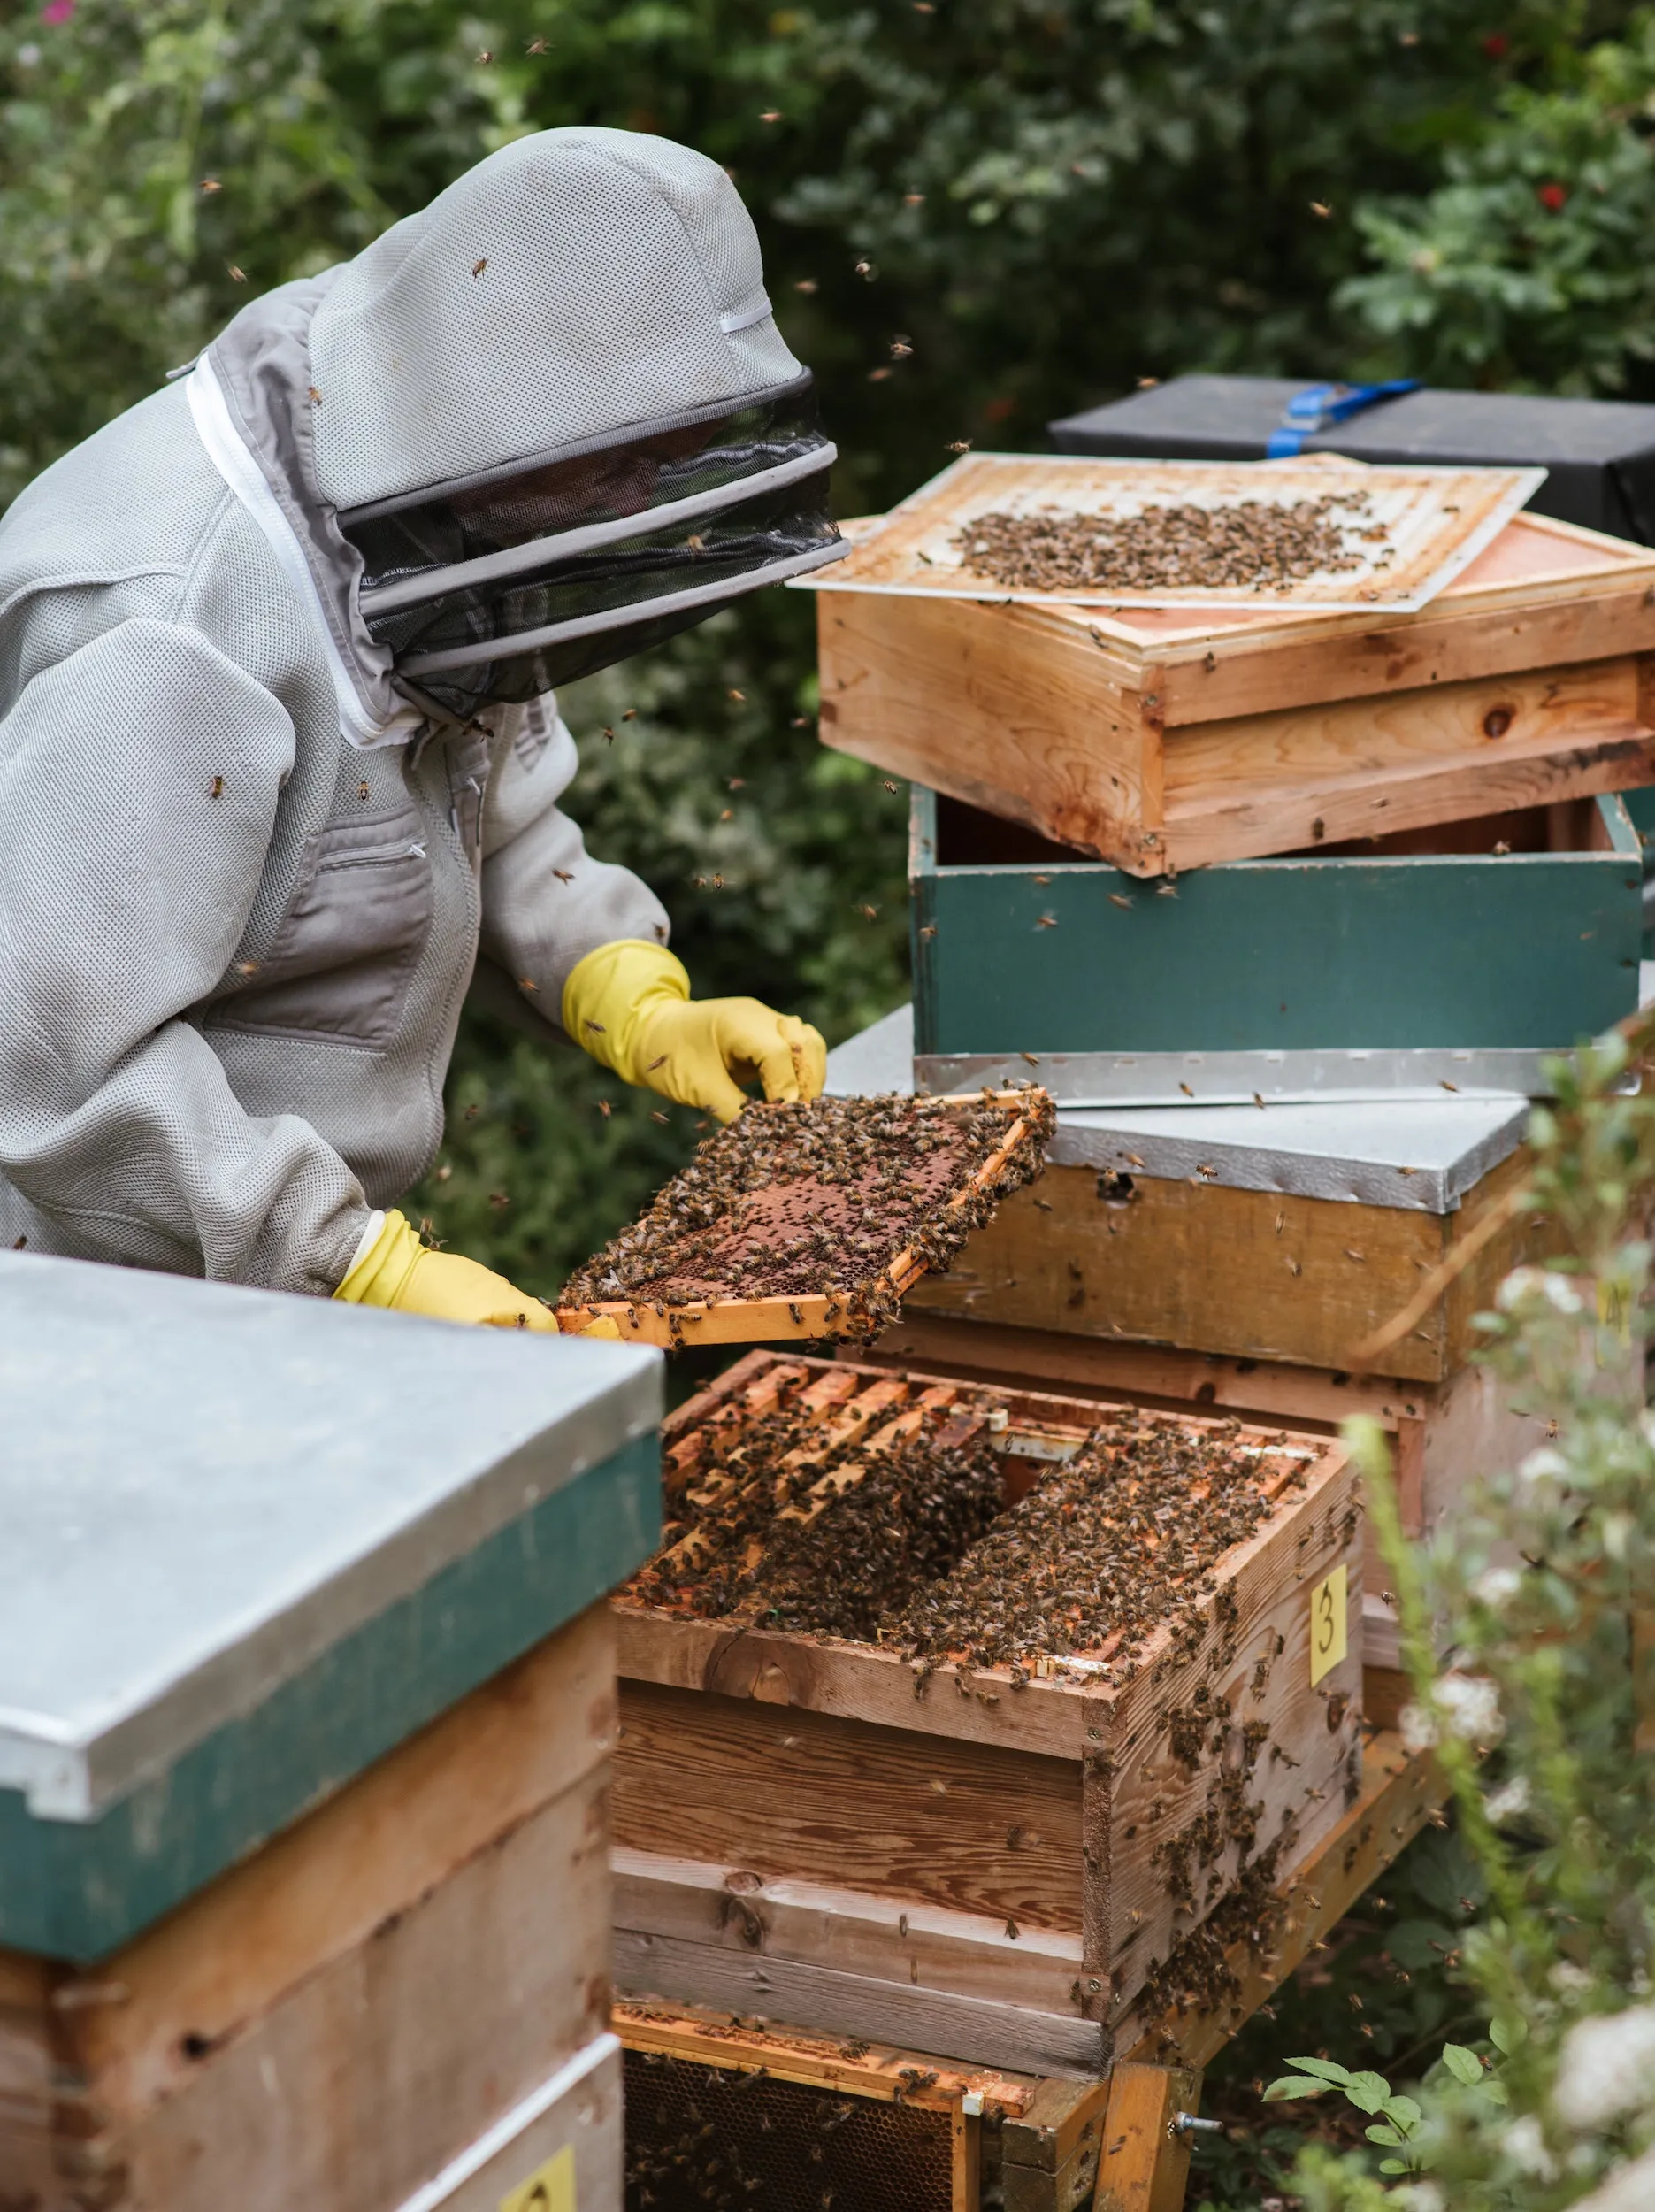
To prepare for an inspection, you'll want to equip any protective gear you have, including a beekeeping suit, pants, and gloves (if desired). While honeybees are not aggressive and don't enjoy stinging humans, it is important to recognize that they are still wild animals, and plan according to Murphy's Law. In addition to your suit, you'll need a hive tool and smoker, along with any other necessities specific to this inspection, such as extra boxes, frames, queen cages, treatments, etc.
While there are many different ways to inspect a beehive, the most common method is to approach the hive from the back, taking care to avoid standing in front of the bees' flight path into and out of the hive. If you're using a smoker, give the front or back of the hive a few puffs of smoke, and crack the inner cover to give a few more puffs up top. Smoke serves a dual purpose during inspections. Firstly, it covers up any alarm pheromones the bees may release, thus keeping the guard bees in a more relaxed state during the inspection. Additionally, it invokes the honeybees' fire response, which prompts the honeybees to start gorging on honey stores in preparation to leave a burning hive. Like humans, having a full belly seems to calm the bees down some, as well as make it harder for them to fly. Care should be taken to not over-smoke the hive, which can cause colony absconding or an extremely defensive response. A few puffs every 5 minutes should do the trick.
After removing the outer and inner covers of the hive, begin by pulling out individual frames from the top box. Take a good look at the frame, noting anything of interest, before returning it slowly to the space you pulled it from. Often beekeepers will need to use their hive tool to gain leverage on the frames or to pry them free from any propolis glue that the bees have spread across the frame joints. You may find it easier to remove 1-2 frames at the edge of the box and carefully check for the queen before setting the frames upright on the ground or in another box. This leaves space for you to work through the other frames more easily, letting you slide the subsequent frames towards you before lifting them vertically upwards, minimizing the risk of destroying any comb or squishing any bees.
Once finished with a box, return all frames to it before removing the box and continuing down to the next one below. Take extra care to return all frames to the correct space in the hive, as leaving empty space in any of the boxes overnight may let the bees fill it with comb, leaving large mess for you to clean up during the next inspection.
Some beekeepers prefer to avoid using smoke, as they believe it causes the bees to take longer to recover after an inspection. Instead, they use a spray bottle filled with a 1:1 sugar water solution, spraying the bees with the water at the start of and throughout the inspection. This provides a similar effect of calming the bees down while also giving them a nice sticky treat, making it temporarily harder to fly after the beekeeper and encouraging grooming. Some beekeepers claim this method establishes positive relationship feedback between the beekeeper and the bees, essentially training them to become less provoked by beekeeper intrusions. This theory, however, has not been scientifically proven, and given the rather short lifespan of a honeybee and the potentially long waiting periods between inspections, any memory of previous inspections is likely to have limited effects on the bees' behavior.
A more effective way of preventing hive defensiveness and avoiding stings is to relax and take inspections slowly. Honeybees are especially reactive to loud bangs and scratches on their hive, and making sudden movements may cause the guard bees to mistake you for a predator. Additionally, wearing light-colored clothing, avoiding any strong scents like perfume or cologne, and limiting inspections to warm, sunny afternoons will help prevent the chance of running into the older (and grumpier) foragers and guard bees, and keep your inspections shorter and more enjoyable.
If you do get stung during an inspection, remain calm and slowly back away from the hive. Honeybee stingers release a large amount of alarm pheromones, and guard bees are drawn to locations of past stings. Using a sharp object such as your hive tool, remove the stinger with a scraping motion (avoid trying to poke or pinch the stinger out, as this will cause the venom sac to inject more venom into your skin). Thoroughly wash the sting site with soap and water, and monitor yourself for any potential negative reactions to the sting. Try to complete the inspection as calmly as possible, and walk away from this experience learning from what happened and with a newfound respect for your bees. Above all, remember that honeybees instinctually react to intruders in this way and that it's nothing personal - they're simply protecting their home, as a healthy colony should. Be proud that your bees are strong enough to ward off intruders, and remember that stings are just a part of beekeeping.
Inspections serve a very important purpose in beekeeping - establishing and monitoring the health of your colonies. The most reliable way to know how your bees are doing is to open up the hive and take a look. There are several things that you should be looking for specifically, including signs of a laying queen, a healthy brood pattern, and plenty of bees and food to support them (depending on the season). Below we'll discuss each of these items in more detail, along with what to look for.
While finding the queen in your hive can be exciting, it shouldn't necessarily be your primary concern (except in specific circumstances such as a suspected queenless hive, or when introducing a new queen). More importantly, you should be looking for signs of a healthy and productive queen. You should find all of the following during each inspection:
Hive strength varies depending on a number of factors, including how old the hive is, how much space the bees have, how much food is in the hive, the genetics and status of the queen, the weather conditions, and whether there are any additional stressors like disease or predators affecting the hive. The most important things to look for to determine your hive strength are the following:
Young colony inspections are fairly similar to that of normal ones, however, beekeepers may opt to inspect these colonies more frequently (around once a week), especially if the bees are actively drawing honeycomb. Important things to look out for include a lack of ample food stores, in which case the beekeeper should begin feeding the colony, as well as issues with comb building such as cross-comb or burr comb. While the hive is establishing itself, care should be taken not to chill any brood in the hive. Honeybee brood must be kept at a constant 95ºF or it will die out. Refrain from opening the hive for too long or separating frames of brood from the rest of the colony. Taking notes and keeping track of your colony's growth during this time is key to ensuring a healthy and productive hive down the road.
Queenless hive inspections are slightly different compared to normal inspections, mainly because there may be little to no brood remaining in the hive. If the colony has a queen but she isn't laying, it may signal that the colony doesn't have enough food stores to support raising the next generation of bees, or that something is wrong with the queen. It's important to note that some queen lines have genetic traits that inhibit colony expansion during times of weak honey flow, such as a dearth.
If the colony instead does not have a queen at all, the worker bees may be more agitated than usual, and normal colony operations slow down. If left queenless for long enough (around 2-3 weeks), the worker bees' reproductive organs may start to develop, and you'll have what are called laying workers. This wouldn't be a problem were it not for the fact that worker bees never mate, and as such can only lay unfertilized eggs that develop into drones. Additionally, worker bees aren't the best at laying strong brood patterns, and oftentimes will lay multiple eggs in one cell, leading to confusing and sporadic brood patterns. The best resolution for queenless hives is to introduce a strong mated queen as soon as possible, or at the very least give the colony a frame of young eggs or queen cells so that the colony can raise its own queen.
Pictured Below:
Healthy Queen Eggs (left) (top) vs Laying Worker Eggs (right) (bottom)
Image courtesy of Joe Collins
Image courtesy of Joe Collins
During the fall, lower temperatures and scarce resources prompt honeybee colonies to start preparing for winter. You should not be opening a hive for more than a few seconds when the temperature is below 50ºF or 10ºC to avoid chilling brood. During this time, the queen begins laying a different kind of brood, and less of it. These special bees are called winter bees, and have a much longer life expectancy compared to normal summer bees (around 6 months compared to 6 weeks). These bees are slightly larger and have bigger fat bodies, which help them last through harsh winter temperatures and, incidentally, are the organs that varroa mites attack.
It's also critical to check that your bees have plenty of honey stores ready for the winter season. Most colonies will need 60-80 pounds of honey to make it through winter, though colonies in colder climates will likely need more. This translates to one deep and one medium box full of honey. If your colony has less than this, we highly recommend feeding your bees a 2:1 solution of sugar water (that's 2 parts sugar to one part water). Additionally, you should be checking for an increased number of varroa destructor mites by performing mite washes and treating when necessary.
During the winter, bees form a tight cluster around 1 to 3 frames, with a very tiny amount of brood in the center of the cluster. The bees vibrate to keep themselves warm, and over time the cluster moves across frames, eating honey stores and maintaining an internal cluster temperature of around 90ºF. The queen remains at the center of the cluster, and lays eggs very sporadically to maintain the colony. It's very important to make sure your colony has access to all of the food in the hive - remove any queen excluders and boxes that don't have food in them. Entrance reducers should be used to discourage hive robbing and protect the hive from cold drafts. Some beekeepers also wrap their hives in insulation, and provide candy fondant in between frames as an extra source of food. We also recommend placing burlap or packed cloth in the space between the outer and inner cover, which serves as a moisture absorber and prevents mold and disease from festering in the colony.
You should avoid opening your hives at all during the winter, except in very specific circumstances such as giving extra food to your colony or checking in late winter to make sure the colony is still alive. Breaking the propolis seal in between boxes allows cold air and pests to get inside the hive and can jeopardize your colony. If you absolutely must open the hive, we recommend restricting the amount of time inside to no more than one minute. Any longer risks killing off any brood inside and severely chilling your bees.
Inspections are one of the many joys of beekeeping, provided you respect the bees and perform inspections responsibly and at the appropriate frequency. Many beekeepers consider inspections akin to a form of meditation, and thoroughly enjoy learning about the fascinating creatures we keep in wooden boxes. While they can seem complicated and impossible at first, practicing inspections and learning from your mistakes is a surefire way to master beekeeping over time. If you're a member of a local bee community, finding a mentor to help with your first few inspections can be a great asset.
Keeping detailed notes of your inspections is also crucial to effective beekeeping and progressing your skills. We've developed an amazing tool to help track your colonies and assist you in your beekeeping efforts. We'd love for you to try it out, and we hope that it makes your inspections more enjoyable and fruitful. Click the button below to give it a whirl!
Proper hive maintenance often depends on a variety of factors including your location, climate, hive strength, and beekeeping goals. As a general rule however, most beekeepers will want to inspect their hives every 2-4 weeks during the spring, summer, and fall, while avoiding opening the hive at all during the winter (except in special circumstances).
When conducting a hive inspection you should see plenty of healthy brood and eggs (a sign that there is a laying queen in the hive) as well as plenty of bees covering the frames. You should also see plenty of nectar and pollen, and no signs of diseases or pests. If the hive is younger or is having trouble, you may need to begin feeding your bees until they have ample food stores. You also should plan ahead for future weather, keeping in mind that bees need a constant food supply in order to maintain a healthy colony.
Many beekeepers have different styles and preferences when it comes to inspecting a colony. The general procedure is to have your beekeeping suit, smoker, hive tool, and any extra frames or boxes ready before you begin your inspection. Start by removing the hive covers and puffing smoke into the top and front entrance of the hive to help calm the bees down. Slowly work your way throughout each frame of the topmost box, using your hive tool to separate and raise the frame and inspecting for signs of a healthy colony before returning the frame to its correct location. Once you've finished with the top box, remove it and set it on its side before repeating the same procedure with the next box down.
Some variations on inspections include using sugar water instead of smoke to calm the bees down, using different tools, skipping some frames, or simply checking that the colony looks healthy and has enough food and brood rather than inspecting each individual frame. As you become more familiar with the inspection process and your bees, you can experiment with different styles and choose the method that works best for you.
It's best to add boxes or frames in times of strong colony growth, usually during a honey flow or period of high flower availability. As a general rule of thumb, most beekeepers will add another box when 70-80% of the frames in the current box(es) are covered with bees. Doing this will aid in swarm prevention, along with giving your bees more room to build wax comb and/or create honey.
If you suspect your colony may have a disease or pests, it's important to act quickly. Depending on the type of disease or pest, you may need to treat your hive, replace the queen, change out the hive parts, or euthanize the hive entirely. We recommend reading more about specific disease responses and pest management techniques.
If you believe your hive is queenless (due to a lack of eggs/brood and a noticeable change in colony behavior), you will need to either introduce a frame of eggs from another colony into the hive, or purchase a queen bee from a supplier and introduce her to the hive. It's important to act as quickly as possible, since honeybee workers will begin laying unfertilized drone eggs in cells if they go without a queen for too long.
© BeekPedia. All Rights Reserved.
Images and videos provided courtesy of copyright owners.